
I’ve been really excited to make this recipe. It’s been floating around in my head for a while. Chocolate covered cookies with a dark, rich shortbread. Shaped to look like miniature chocolate bars. Then, coated in a thin shell of chocolate and garnished with gold foil. I’ve had edible gold foil sitting in a drawer for over a year which I’ve used a little bit of. But after this week I’m happy to report that it’s been used to its full potential.


My Favorite Chocolate Recipes
My family is completely obsessed with chocolate. I grew up with a mom who is probably the world’s biggest fan of chocolate, and a grandmother who eats entire bags of M&M’s in one sitting. So, as much as I love chocolate, I’ve always viewed myself as a chocolate moderate compared to them. But from a young age I requested chocolate for every birthday cake. One of my first recipes I made from my first cookbook was chocolate cupcakes with “crispy magic frosting” and a chocolate swoosh garnish.
It was when I was really getting into Masterchef Australia and I had an intense need to get creative in the kitchen. I was going through a cupcake phase. There was one summer when I made red velvet cupcakes. I made them one sunny day to accompany the airing of my favorite murder mystery show. I topped them with chocolate icing instead of cream cheese frosting. And I vividly remember the weather being sweltering. We ate cupcakes at night huddled around the A/C. They were exceptionally moist and flavorful.


Chocolate Bars + Dessert
I also made my own 14th birthday cake, from the same cookbook. Midnight chocolate cake. An amazing double chocolate cake with a dark chocolate cake base, which I overcooked. It was hard to tell when it was done. I made the same frosting recipe as my cupcakes but it was loose and runny. I always remembered it as grand and magical and delicious — but I recently found a picture of me in a purple shirt admiring it on my birthday and it looked like a big pile of chocolate slop. Oh well. The purpose of the story is that I’ve always loved chocolate more than anything else when it comes to dessert.
One of my favorite things is to have a few squares of dark chocolate after dinner. In college I used to dip them into a tub of honey-roasted peanut butter before bed each night. So I’ve seen my fair share of those magical bumpy chocolate squares covered in gold foil. Fast forward to now and the weather has been amazing (for the most part) and spring has sprung. So my desire to bake warm, comforting cookies has decreased. But I’ve been craving a crisp, buttery chocolate shortbread cookie for a while. While sketching ideas, I realized I could make chocolate covered cookies that look like chocolate bars.


An Advanced and Experimental Chocolate Recipe
But this project was a difficult one, compared to most recipes. It took a bit of trial and error. I wanted chocolate covered cookies that were snappy and buttery and tender. Not too much chocolate glaze – I didn’t want to detract from the taste of the cookie. And I wanted the shape to be perfect. I even bought a miniature waffle mold from online, hoping to press my shortbread dough into it to chill. But they were too small and not the right shape. So, my recipe this week started with diving into a rich black cocoa shortbread dough. A super easy one to make with just a couple ingredients.
You start with flour, cocoa, sugar, and salt in a bowl. Then you add your softened butter until it becomes sandy. It’s the same dough as my chocolate tart, which is short, crisp, and full of chocolate flavor. Not too sweet at all. The final step is to add an egg yolk, which hydrates the dough and evolved it into something cohesive from a shaggy mess. I always work it just enough to come together and wrap it with plastic to chill for a bit. I was super hopeful and tentative about this recipe, knowing that each step needed to be executed perfectly. So I readied my ingredients and my tools and ran through scenarios in my head.


Baking + Shaping Chocolate Shortbread
Once my dough was chilled, I let it soften for a few minutes on the counter before rolling it out. In my first attempt, I rolled it too thin. But these are best with a semi-thick base, about 1/2”. They need to stand up to the melted chocolate, not only in terms of heft but in flavor. So, I corrected my mistake and carried on. I cut out miniature chocolate bar shapes, just rectangles, until I had about 9 or 10. Then, I took the scraps and rolled the dough back out, cutting a few more until I didn’t have enough dough left. Next I carefully transferred my dough to a piece of parchment paper on a thin baking sheet with no edges.
At that point my dough had softened quite a bit and came to room temperature. I would recommend chilling yours a little before this next step. To make the chocolate covered cookies, you want your dough base to resemble a naked chocolate bar. So, to make the texture and shape, I used a chopstick to indent the rectangles with 8 equal chocolate bar segments. Be careful not to press too hard into the dough. I did break a couple at first. I started to become happy with them after a few minutes of obsessively pressing them back into even shapes and sculpting them how I wanted them. And then they went into the freezer to chill while the oven preheated.


Melting Chocolate Glaze
I was so excited to bake them. And I hoped that they wouldn’t spread or lose their shape in the oven, despite the abundance of butter in the dough. The freezer helps with that. So I popped the cold chocolate cookies into the oven and timed them carefully. The thicker ones, the proper ones, take about 15 minutes. Cooking them a little further than you normally would helps them stay crisp and firm. My first batch was too thin, and too soft, only cooking for 10 minutes. So do as I say, not as I do. The next batch was better, and the chocolate bars held their shape, mostly.
I quickly used my chopstick to re-shape them after they came out of the oven. You have to be quick before they cool and set. Finally I took in the smell of the rich chocolate shortbread cookies and became so excited to taste one. The shape resembled my chocolate bar vision so well. All that was left was to let them cool and turn them into chocolate covered cookies with a thin veil of melted chocolate. I used a bag of chocolate chips from the cupboard. My first attempt was a dance of microwaving chocolate and adding extra chips to cool it down quickly, thinking I could temper chocolate without trying too hard. Wrong.


Chocolate Covered Cookies
Tempering the chocolate would be amazing, but it’s hard. You need a thermometer and a lot of patience. But these chocolate covered cookies can just be kept in the fridge and they’re just as good and snappy. My first batch of melted chocolate was too thick, but I impulsively poured it over some of the cookies anyway. It totally obscured the shape of the them and added a much-too-thick layer of brown chocolate that totally ruined the balance of flavor. So, I stopped myself and did some troubleshooting. I had a jar of coconut oil that I wanted to use, but I was tentative that adding it would keep the chocolate from setting. I was determined to temper it the old fashioned way.
But when I abandoned my plan, I realized I could add a touch of coconut oil to thin it out and make a luscious glaze for my chocolate covered cookies. It turned out much, much better, and even though half of my cookies were ruined, I carried on with the rest. I let them sit at room temperature for a bit. They had a beautiful brown glaze that looked thin and glossy. But it was a hot day. So I threw them into the freezer to finish setting. And finally I had actual chocolate covered cookies. All that was left was to add gold foil.


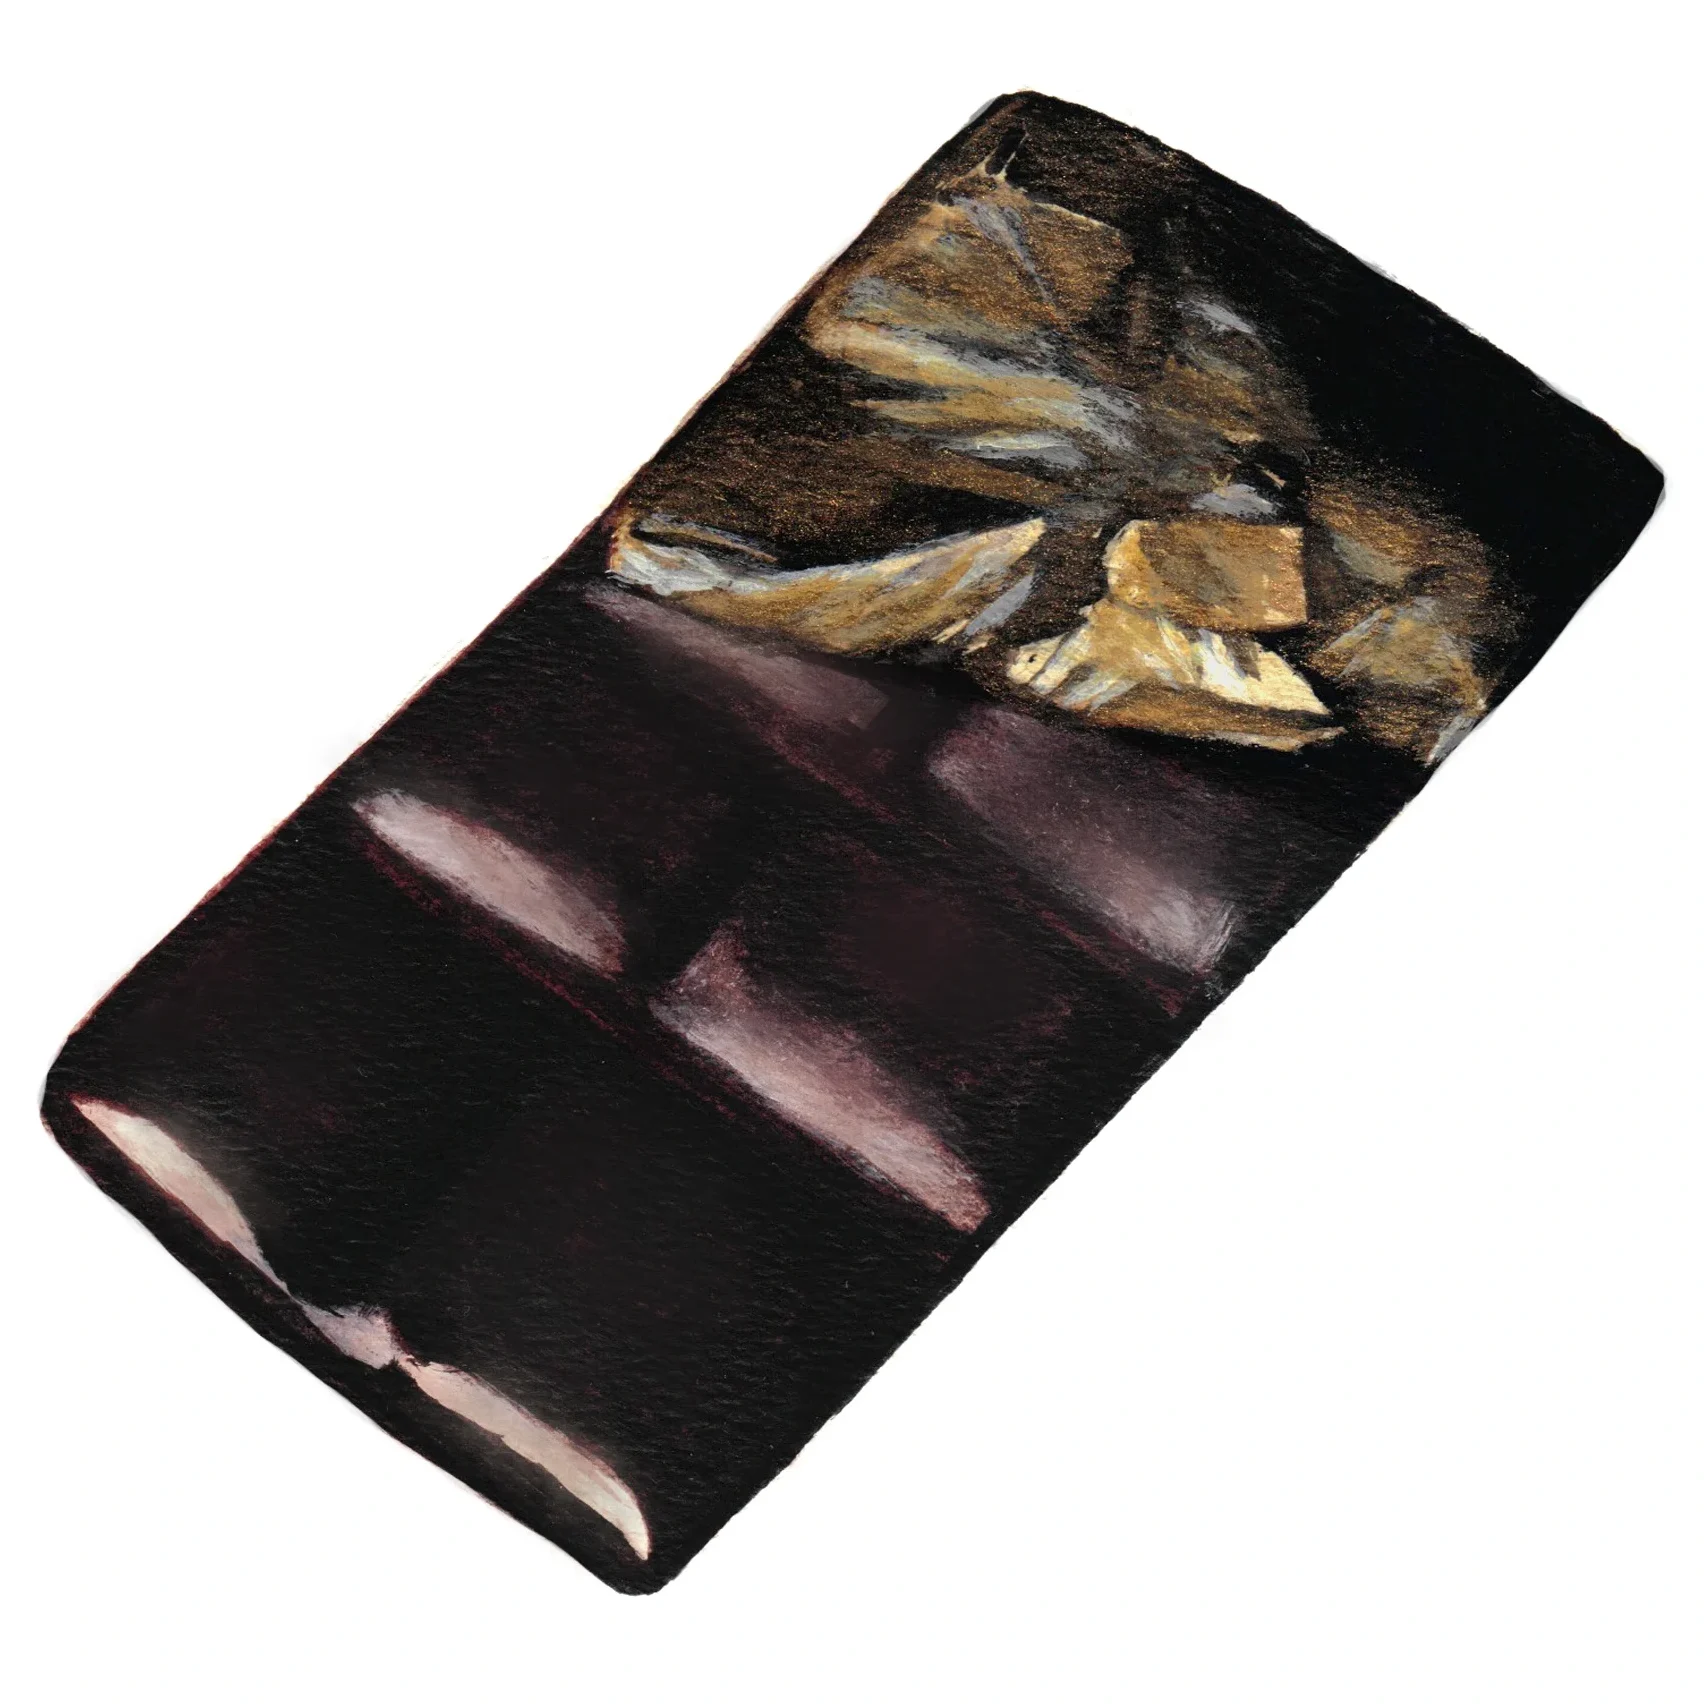
Gold Foil “Candy Bars”
I experimented with a couple, carefully placing the gold foil on top. One sheet ripped and tore easily, so I added a couple pieces over it. With the few cookies I had left, I carefully used my practice to place gold foil on one half of the most perfect chocolate covered cookie. And I pressed it gently into the curves of the chocolate bars with my fingers. Finally, I was happy. And I had something that resembled my vision. I gleefully took some photos and then dug into my failed pieces. Too chocolatey. If that’s even possible. I was going for something more rich, dark, and cookie-forward.
So, I tried one of the good ones, and the balance was much, much better. You can taste a slightly sandy (in a good way), buttery dough. Like a chocolate sable. And it melts beautifully as you eat it. They remind me of homemade Oreos without the cream. The chocolate covered cookies are intensely dark and chocolatey. So the coating brings it back to a very happy medium with a complementary milk chocolate flavor. I would be curious to add some sea salt or fruit zest next time for flavor. But overall, I was so happy with how these came out.


A Rich Chocolate Taste
So, the key is to make them thick enough and bake them for long enough to keep them crispy and strong. Then, mix a little coconut oil into your chocolate to keep the glaze thin. Practice with your gold foil, if you can, or just embrace randomness and go for abstraction. Anyway, these taste fantastic. Like miniature chocolate tarts with a rich shortbread base. And I’m blown away by how they look. True to my artistic vision. I’m excited to paint my watercolor. I never get to paint gold. And I love how soft the lighting looks on the chocolate glaze, highlighting the bumps and valleys of the chocolate bar shape.
Happy Mother’s Day! If your mom loves chocolate as much as mine, these are a perfect gift to make. The gold standard, if you will. Next week is the start of the farmers market! Last year I went every Thursday and never skipped a week. My form of self care. So, my goal for this year is to do the same. It really makes me so happy – and it’ll bring a new level of seasonal freshness to the blog.
Thank you for reading! Be sure to check out my Etsy for 100’s of recipe cards and art prints for your home. Use code THEFORKEDRING for 25% off. Happy spring!

Chocolate Covered Cookies
Ingredients
- 1 cup AP flour
- 1/4 cup black cocoa
- 1/4 cup white sugar
- 1 tsp kosher salt
- 8 tbsp butter softened
- 1 egg yolk
- 12 oz dark chocolate
- 1 tbsp coconut oil
- 12-20 sheets Edible gold foil for garnish
Instructions
- In a large bowl, combine flour, black cocoa powder, and salt.
- Add your butter and work in with your hands or a fork until mixture has small clumps.
- Add your egg yolk and work into a dough, just until combined. Wrap and chill for at least 30 minutes.
- Preheat oven to 350°F. Remove dough from fridge and let rest for 15 minutes.
- Roll dough into an even rectangular sheet on a lightly floured work surface (about 10 x 18 inches) and 1/2” thick.
- Cut even rectangles with a cookie cutter or a ruler and knife (about 2” x 4”) and transfer to a piece of parchment paper with a spatula.
- Press dough scraps into a ball and roll out again to the same thickness, cutting more cookies until you have a total of 10-12.
- Chill dough for 5 minutes in the fridge or freezer. Then, using a chopstick or dowel, press a vertical bisecting line into each rectangle (not pushing all the way through, just enough to indent).
- Then, repeat pressing lines into each cookie horizontally, 3 times equally to form 8 chocolate “square” shapes on each.
- Chill cookies for 10 minutes in the freezer before baking to keep from spreading. Then, bake for 15 minutes.
- Remove cookies from oven and press your chopstick or dowel into the cookies once again with less pressure to reaffirm the chocolate bar lines.
- Let cookies chill for a few minutes, then transfer carefully with a spatula to a wire cookie rack. Let rest again for at least 30 minutes.
- Next, place your chopped chocolate bar or chocolate chips in a microwave-safe bowl. Microwave on half power for 2 minutes until starting to melt and stir.
- Then, continue microwaving in 30 second bursts on full power, stirring each time, until completely melted.
- Add your coconut oil and whisk to combine. Make sure the oil melts completely.
- Pour your chocolate coating equally onto each cookie, covering the tops completely. Place a baking sheet lined with parchment paper under the wire rack to collect chocolate discard.
- Your chocolate coating should be the consistency of crepe batter. Allow the chocolate cookies to cool and set at room temperature for 10 minutes. Garnish each cookie with a piece of edible gold foil.
- Then, transfer cookies to fridge to set completely and serve.
Notes
- Oven temperatures may vary, so I recommend baking one cookie first for 15 minutes and letting it set to harden at room temperature. If it’s too soft, add a couple minutes of baking time. If it tastes burnt and crispy, reduce baking time by a couple minutes.
- You can use olive oil or vegetable oil in your melted chocolate if you are allergic to coconut oil.
- Edible gold foil is easy to find – try Amazon or a quick google search. I used this
Leave a Reply